
14-SECOND GUIDE
Inflate and raise the tent body
See how to unpack the tent, close the valves, install the inflation battery and raise the air-frame body. Stay beside the tent until the automatic stop completes.
SET UP. CHECK. GET BACK OUTSIDE.
Watch the inflation, solar-roof and pack-away tutorials, then use the written checks to solve common setup and charging issues.
Choose a different product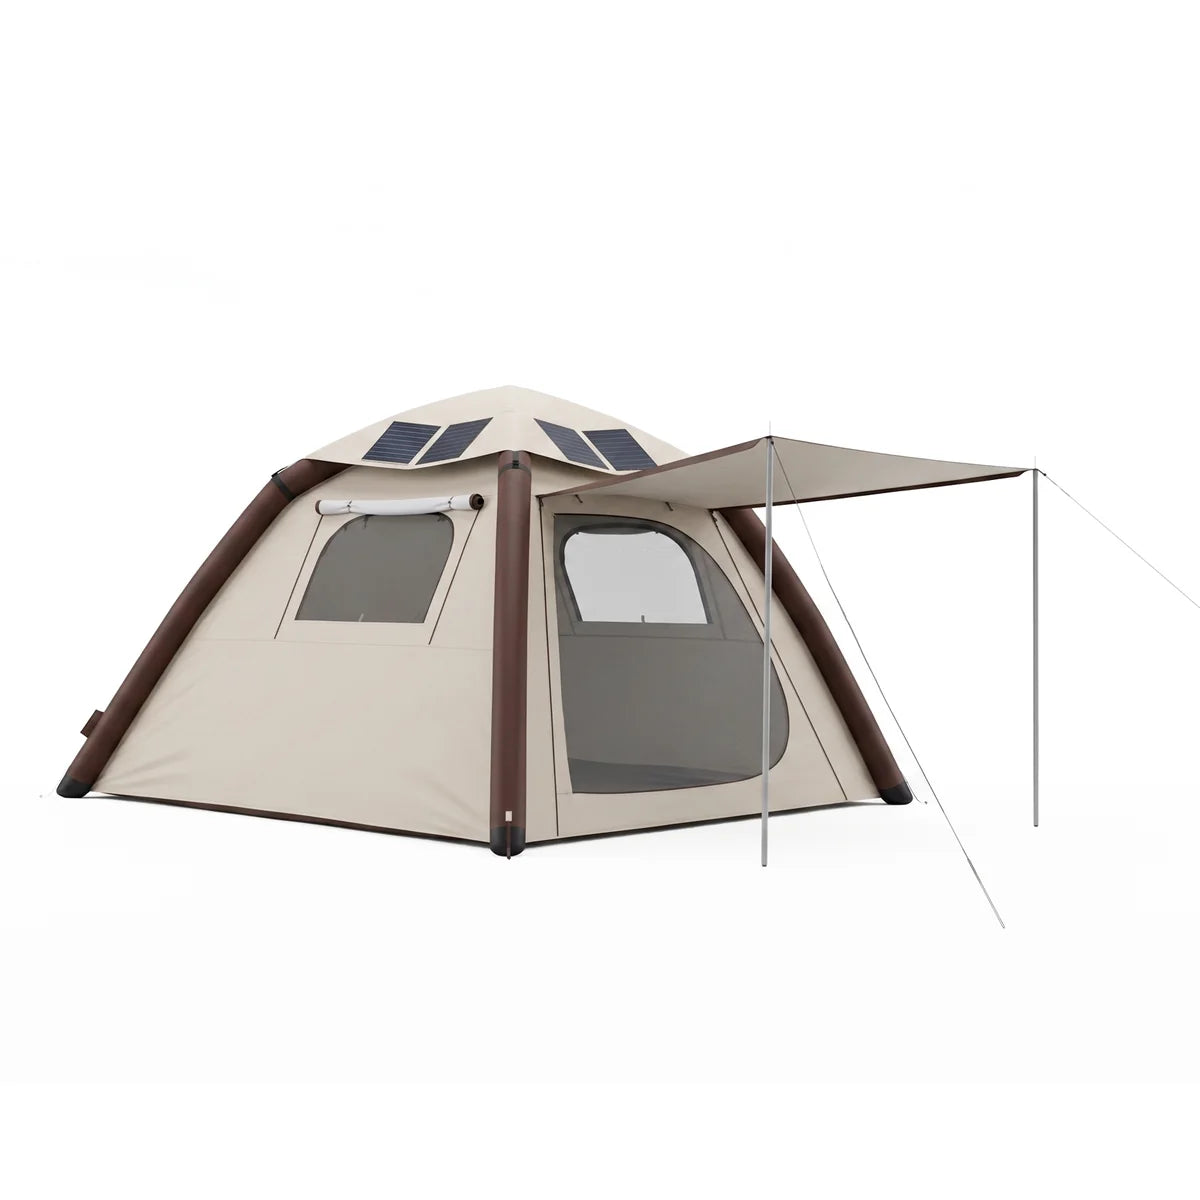
Stay with the tent throughout inflation. About 3 minutes refers to inflating the tent body only, not securing every stake, guy rope, canopy pole or solar roof. Do not override the automatic stop or infer a target from the pump’s maximum-pressure rating.
QUICK ANSWERS
WATCH EACH TASK
Use the short video for the task in front of you. The written steps remain below for details, safety notes and quiet viewing.
14-SECOND GUIDE
See how to unpack the tent, close the valves, install the inflation battery and raise the air-frame body. Stay beside the tent until the automatic stop completes.
15-SECOND GUIDE
See how the solar roof sits over the air frame, how its attachment points are secured and how the cable connects inside the tent. This tutorial applies to versions supplied with the 52W solar roof.
16-SECOND GUIDE
See the safe removal, deflation, folding, rolling and bagging sequence. Before following it, remove detachable parts and make sure the tent and solar roof are clean and completely dry.
GET TO KNOW YOUR GEAR
Illustrations are taken from this product's supplied manual. Page references count the PDF cover as page 1. Select an illustration to view it larger.
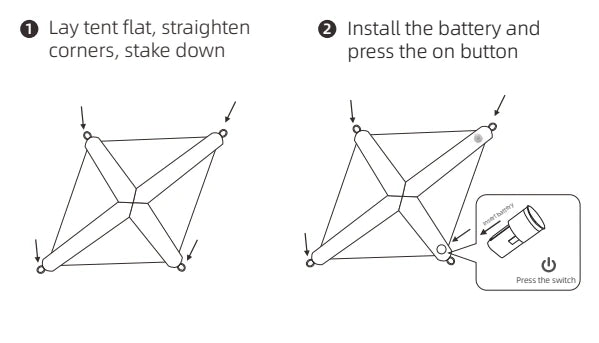
After inflation, secure the guy ropes with the ground stakes. Adjust the rope length and tension using the illustrated fittings.
If using the door canopy, assemble and secure its poles and guy ropes according to PDF page 5. Do not use the tent in heavy storms or high winds.
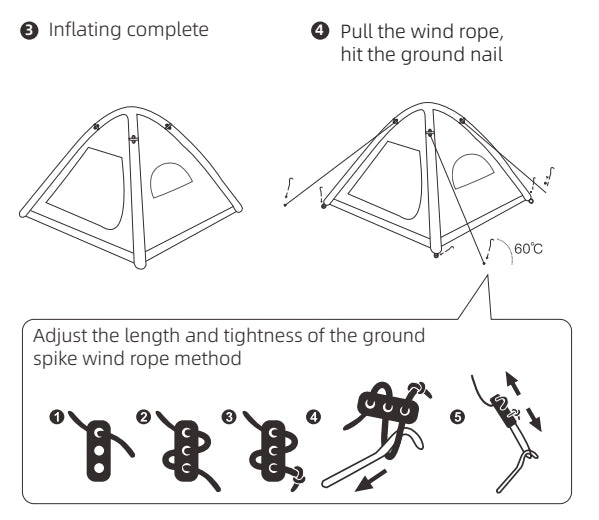
Prepare the solar roof. Place its plastic hooks into the straps on the air columns as shown. Keep the solar panel area unobstructed for charging.
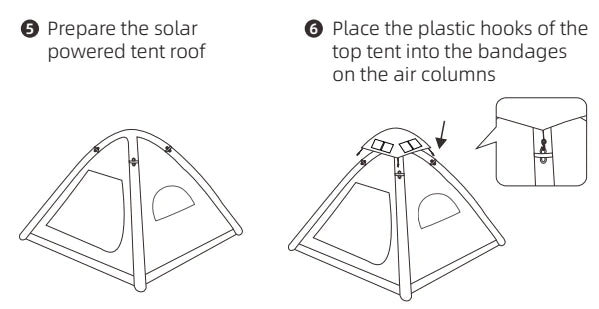
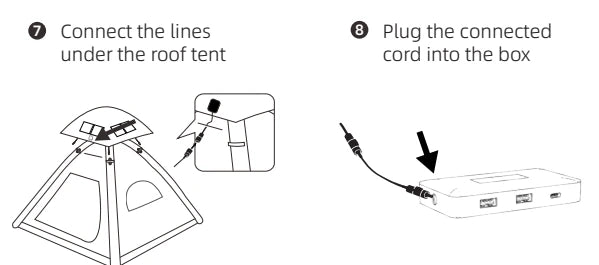
Connect the lines beneath the solar roof, then plug the connected cord into the junction box, following the illustration. Match your actual connectors and do not force a connection.
The inflation battery is for the pump; do not assume it stores solar power for your devices. Plan a separate compatible energy source for use after sunset.
FIND YOUR SYMPTOM
Open the question that matches your issue. These checks do not require opening or repairing the electronics.
What to look for: Check whether inflation starts when the correctly installed battery and pump are ready.
If it is still unresolved: Tell us what happens at the switch and the battery’s condition. Do not open the pump.
Manual: PDF pages 2–6 and 8. No target pressure is inferred from the specification table.
Get help with this product ↓What to look for: The tent should inflate and the automatic system should stop as described in the manual.
If it is still unresolved: Do not override the pressure system or choose a pressure from the maximum rating. Describe the abnormal behavior.
Manual: PDF pages 2–6 and 8. No target pressure is inferred from the specification table.
Get help with this product ↓What to look for: Look for an identifiable loose valve or visible damage; these checks do not diagnose a hidden leak.
If it is still unresolved: Contact support with the location of the affected column and when the softening occurs. Do not improvise repairs.
Manual: PDF pages 2–6 and 8. No target pressure is inferred from the specification table.
Get help with this product ↓What to look for: Look for the connected device’s charging indication.
If it is still unresolved: Provide the device model and the ports and cable used. Do not open the junction box.
Manual: PDF pages 2–6 and 8. No target pressure is inferred from the specification table.
Get help with this product ↓What to look for: Check your planned energy source independently before relying on it overnight.
If it is still unresolved: Tell us which device you need to power and which energy source you plan to use.
Manual components and inflation instructions; LINKSOLAR energy-planning clarification.
Get help with this product ↓What to look for: The dry, deflated tent should be ready for the illustrated storage-bag arrangement without forcing it.
If it is still unresolved: If a part prevents safe packing, describe it before applying more force.
Manual: PDF pages 2–6 and 8. No target pressure is inferred from the specification table.
Get help with this product ↓What to look for: The air-frame should rise without a trapped or sharply folded column.
If it is still unresolved: Stop if a column remains folded, twisted or unusually soft. Send the affected column location and a photo before trying again.
Setup video and manual: PDF pages 3–4.
Get help with this product ↓What to look for: A correctly closed, undamaged valve should not show obvious escaping air.
If it is still unresolved: Do not apply glue, heat or an improvised repair. Contact support with the valve location and a close photo or short video.
Setup and pack-away videos; manual valve instructions.
Get help with this product ↓What to look for: The connected device should show a charging indication when light and the full connection path are suitable.
If it is still unresolved: Provide the tent version, device model, cable, port used and a photo of the roof and junction-box connection. Do not open the junction box.
Solar-roof video and manual: PDF page 4. 52W is rated power; actual output varies.
Get help with this product ↓What to look for: Charging should become steadier when illumination and the connection remain stable.
If it is still unresolved: Tell us the weather, time, device, cable and whether charging changes when the panel is repositioned.
Solar operating conditions and LINKSOLAR troubleshooting guidance.
Get help with this product ↓What to look for: Fabric, seams, cables and connectors must be completely dry before storage or electrical use.
If it is still unresolved: Stop using any connector or battery that was submerged, damaged or remains unusually hot. Contact support before reuse.
Manual care and warning sections. No numeric waterproof rating is added here.
Get help with this product ↓What to look for: The contents should match the selected version, including whether the 52W solar roof was ordered.
If it is still unresolved: Send your order number, tent color, solar-roof version, product label and photos of the contents.
Product variant and packing-list guidance.
Get help with this product ↓KEEP IT READY
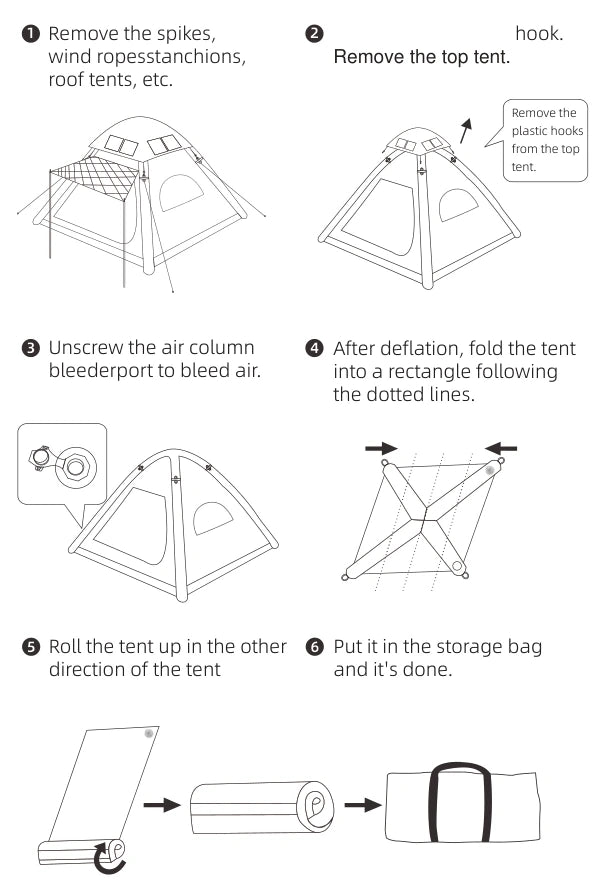
Before storage, make sure the tent is fully deflated, clean and completely dry. Remove the ground stakes, guy ropes, poles and solar roof as shown in the manual.
Release air using the air-column valve, fold along the illustrated lines and roll into the storage bag. Keep the inflation battery away from high heat and water.
Regularly inspect the air valves, fabric and solar panel. Do not use sharp objects near the air columns or leave the tent exposed to extreme weather.
Manual: PDF pages 6 and 8.
THE COMPLETE REFERENCE
52W Inflatable Solar Tent · English PDF · 9 pages · 0.55 MB
Download manual ↗ All manualsSTILL NEED A HAND?
This request includes your product: 52W Inflatable Solar Tent.
Include your order number, tent color, whether your version includes the 52W solar roof, the step where the problem occurred, connected device and cable details, and the checks you already tried. We can request photos or a short video by email.
Do not include passwords, payment details or identity documents.